


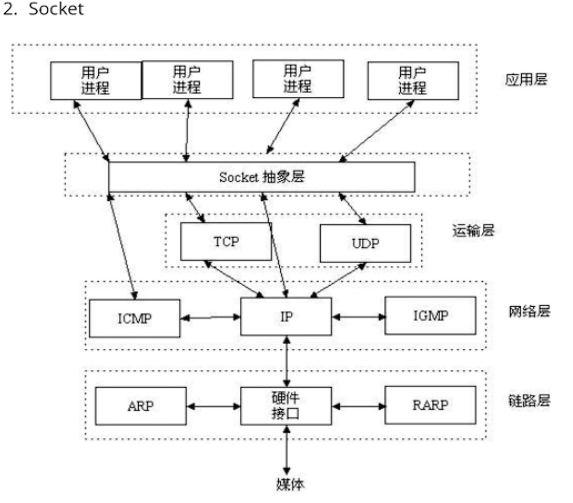
TCP编程
1.软件架构设计
CS架构:服务器客户端程序 ---- 日常软件 游戏等
优势:把一部分计算留在客户端进行,缓解服务器压力。
劣势:如果游戏或者软件升级,客户端必须手动更新。
客户端:可以给服务器发送数据的软件,也可以接收服务器发送过来的消息。
服务器:负责接收客户端发送来的数据,处理数据,给客户端以响应。
BS架构:浏览器服务器架构 ----网页 电子商务 办公流程 企业级开发等
优势:更新维护成本比较低。
劣势:没办法再客户端做大量计算。
客户端和服务器端连接
客户端
public class Client {
    public static void main(String[] args) throws Exception {
        //1.创建Socket对象连接服务器
        Socket socket = new Socket("localhost",9999); //(对方的IP地址,端口号)
        System.out.println("客户端连接服务器成功");
    }
}
服务端
public class Server {
    public static void main(String[] args) throws Exception{
        //1.创建客户端对象
        ServerSocket ss = new ServerSocket(9999);
        System.out.println("服务器端启动成功,等待连接");
        //2.等待客户端连接
        ss.accept(); //会有阻塞现象 有客户连接才会进行
        System.out.println("客户端连接成功");
    }
}
先运行服务器端再运行客户端可以实现联通。
客户端服务器端数据传输_简单版
服务器端 ---- Socket对象 ---->> 客户端
两边通过socket连接的两个端使用的是同一个socket,想要传输数据只需要往socket里面写入数据即可
客户端
public class Client {
    public static void main(String[] args) throws Exception {
        //1.创建Socket对象连接服务器
        Socket socket = new Socket("localhost",9999); //(对方的IP地址,端口号)
        System.out.println("客户端连接服务器成功---用户");
        Scanner sc = new Scanner(System.in);
        while (true){
            //2.从客户端发送数据给服务器
            OutputStream os = socket.getOutputStream();
            //把字节流os通过OutputStreamWriter转化为字节流,然后再BufferedWriter添加缓冲区
            BufferedWriter bw = new BufferedWriter(new OutputStreamWriter(os));
            bw.write(sc.nextLine());
            bw.newLine(); // 为了保证对方readLine接收的时候可以接收到数据
            bw.flush(); //不可以省略,否则容易接收不到数据
            // bw.close();//不可以关闭这个流
            // socket.close();//确保整个数据传输OK了 最好在程序的最后使用
            //4.客户端接收数据
            InputStream is = socket.getInputStream();
            BufferedReader br = new BufferedReader(new InputStreamReader(is));
            String content = br.readLine();
            System.out.println("接收到的服务端数据:" + content);
        }
    }
}
服务端
public class Server {
    public static void main(String[] args) throws Exception{
        //1.创建客户端对象
        ServerSocket ss = new ServerSocket(9999);
        System.out.println("服务器端启动成功,等待连接");
        //2.等待客户端连接
        Socket s = ss.accept(); //会有阻塞现象 有客户连接才会进行
        System.out.println("客户端连接成功---服务器");
        Scanner sc = new Scanner(System.in);
        while (true){
            //3.服务器接收数据
            InputStream is = s.getInputStream();
            BufferedReader br = new BufferedReader(new InputStreamReader(is));
            String content = br.readLine();
            System.out.println("从客户端接收到的数据是:" + content);
            //4.给客户端发送数据
            OutputStream os = s.getOutputStream();
            BufferedWriter bw = new BufferedWriter(new OutputStreamWriter(os));
            bw.write(sc.nextLine());
            bw.newLine();
            bw.flush();
        }
    }
}
这样我们实现了简单的通讯,但是会发现当我们一方发送多条消息的时候无法正常发送,只能双方互相发送一条才可以发送数据。
这时就要引入多线程的思想了。
客户端服务器端多线程操作
下面我们通过多线程实现双方通信
接收数据线程
public class ReceThrad extends Thread{

    public Socket s;
    public ReceThrad(Socket s){
        this.s = s;
    }

    @Override
    public void run() {
        //不停的接收数据
        while (true){
            try {
                InputStream is = s.getInputStream();
                BufferedReader br = new BufferedReader(new InputStreamReader(is));
                String content = br.readLine();
                System.out.println("接收到的数据是:" + content);
            } catch (IOException e) {
                throw new RuntimeException(e);
            }
        }
    }
}
发送数据线程
public class SendThread extends Thread{
private Socket s;
public SendThread(Socket s){
this.s = s;
}
@Override
public void run() {
Scanner sc = new Scanner(System.in);
//不停的发送数据
while (true){
try {
OutputStream os = s.getOutputStream();
BufferedWriter bw = new BufferedWriter(new OutputStreamWriter(os));
bw.write(sc.nextLine());
bw.newLine();
bw.flush();
} catch (IOException e) {
throw new RuntimeException(e);
}
}
}
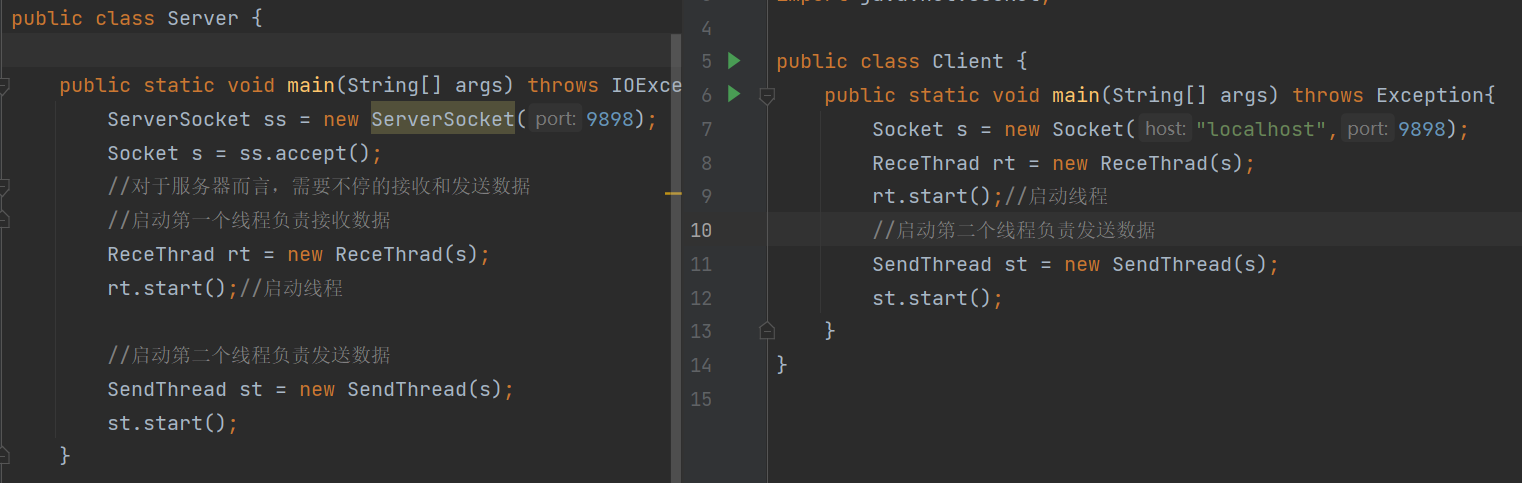
}客户端和服务器
双方代码基本一致
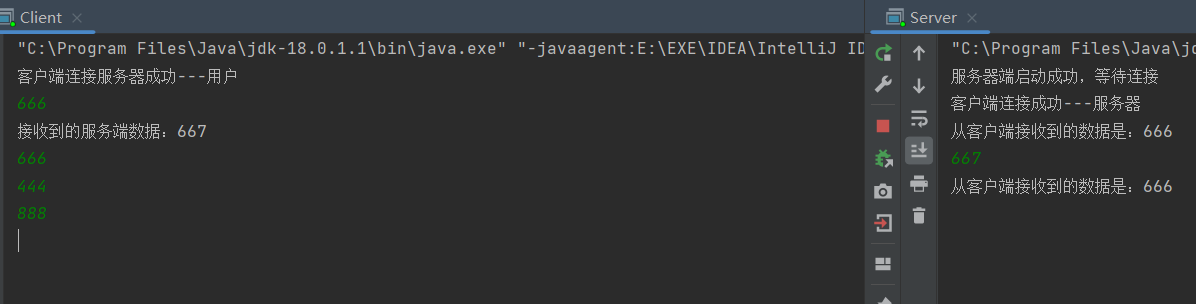
最终效果

但是我们想实现多人聊天呢?当前的效果仅为双方聊天实现了最基本的通信。
服务器只实现了中转的作用。
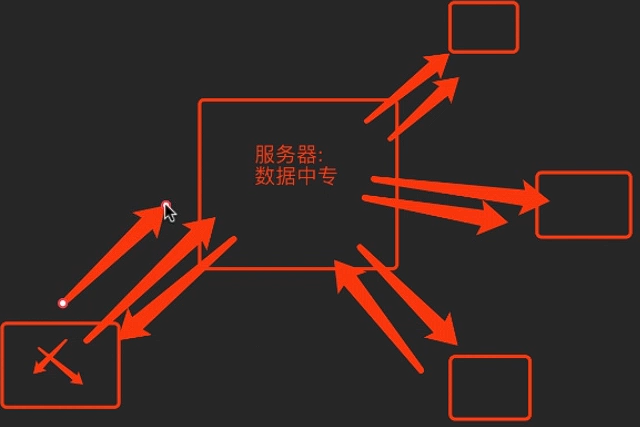
TCP实现多人在线聊天
客户端
public class Client {
    public static void main(String[] args) throws Exception{
        System.out.println("请输入您的昵称:");
        Scanner sc = new Scanner(System.in);
        String name = String.valueOf(sc.nextLine());
            //1.连接服务器
            Socket s = new Socket("localhost",8989);
            //2.不停的发送消息
            new SendMsgThread(s,name).start();
            //3.不停的接收消息
            new ReceMsgThread(s).start();
    }
}
服务端
public class Server {
    public static void main(String[] args) throws Exception{
        //开启服务
        ServerSocket ss = new ServerSocket(8989);
        //能装客户端的列表
        List<Socket> socketList = new ArrayList<Socket>();
        //不停的接收消息
        while (true){
            Socket s = ss.accept();
            socketList.add(s);
            //为每一个客户端启动一个线程,用来监听线程是否有消息传递进来
            new ServerMsgThread(s,socketList).start();
        }
    }
}
服务工具类
/**
 * 工具类 负责发送和接收消息
 */
public class SocketUtil {
    //1.发送消息
    //静态的内容可以直接用类名访问,调用的时候就不用new对象了
    public static void send(Socket s,String msg){
       try {
           OutputStream os = s.getOutputStream();
           BufferedWriter bw = new BufferedWriter(new OutputStreamWriter(os));
           bw.write(msg);
           bw.newLine();
           bw.flush();
       }catch (Exception e){
           e.printStackTrace();
       }
    }
    //2.接收消息
    public static String rece(Socket s){
       try {
           InputStream is = s.getInputStream();
           BufferedReader br = new BufferedReader(new InputStreamReader(is));
           String msg = br.readLine();
           return msg;
       }catch (Exception e){
           e.printStackTrace();
       }
       //不正常或者报错的返回结果
        return null;
    }

}
客户端接收信息
public class ReceMsgThread extends Thread{
    private Socket s;
    public ReceMsgThread(Socket s){
        this.s = s;
    }

    @Override
    public void run() {
        while (true){
            //接收消息
            String msg = SocketUtil.rece(s);
            System.out.println(msg);
        }
    }
}
客户端发送信息
public class SendMsgThread extends Thread{

    private Socket s;
    private String name;
    public SendMsgThread(Socket s,String name){
        this.name = name;
        this.s = s;
    }

    @Override
    public void run() {
        name = "用户" + name+":";
        Scanner sc = new Scanner(System.in);
        while (true){
            //考虑把发送消息的功能单独提取出来
            String content = name + sc.nextLine();
            SocketUtil.send(s,content);
        }
    }
}
服务端收发数据
public class ServerMsgThread extends Thread{
    private Socket s;
    private List<Socket>socketList;
    public ServerMsgThread(Socket s,List<Socket> socketList){
        this.s = s;
        this.socketList = socketList;
    }

    @Override
    public void run() {
        while (true){
            //接收消息
            String msg = SocketUtil.rece(this.s);//外面全局的s
            //把接收到的消息发送出去 -> socketList
            for (Socket s: socketList){
                //当前客户端相同则不发送
                if (s.equals(this.s)){
                    continue;
                }
                SocketUtil.send(s,msg);
            }
        }
    }
}
最终效果
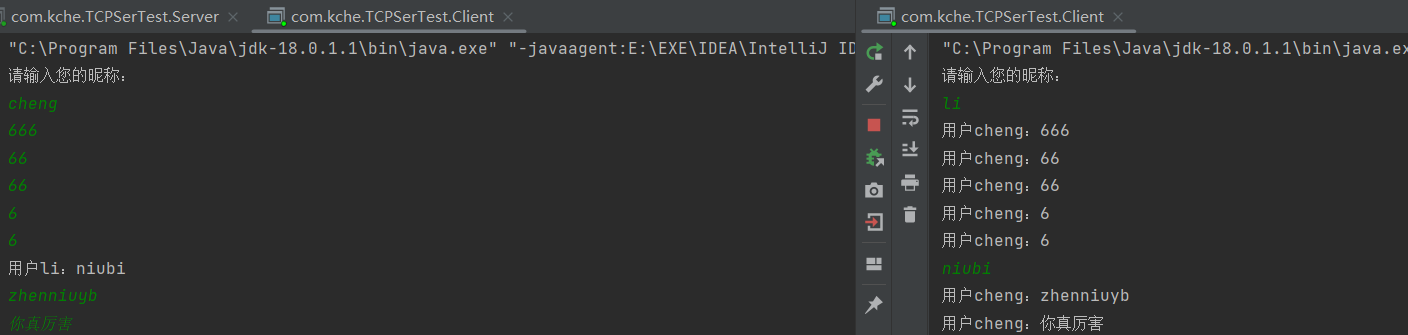
UDP编程
UDP:不连续,不安全,把数据发送出去就完了
快递员:DatagramSocket
包裹:DatagramPacket
客户端服务器简单数据传输
客户端
public class Client {
    public static void main(String[] args) throws Exception {
        //从客户端发送数据
        //1.快递员
        DatagramSocket ds = new DatagramSocket(9898);
        //2.创建包裹 内容+对方地址和端口 数据必须是字节,且必须告诉有效数据长度
        byte[]bs = "你好啊".getBytes();
        DatagramPacket dp = new DatagramPacket(bs,bs.length, InetAddress.getByName("localhost"),7890);
        //3.把包裹发送出去
        ds.send(dp);
        //接收数据
        byte[] bytes = new byte[1024];
        DatagramPacket dp2 = new DatagramPacket(bytes,1024);
        ds.receive(dp2);
        String content = new String(bytes,0,dp2.getLength());
        System.out.println("客户端:" + content);
    }

}
服务端
public class Server {
    public static void main(String[] args) throws Exception{
        //快递员
        DatagramSocket ds = new DatagramSocket(7890);
        //准备接收数据
        byte[]bytes = new byte[1024];//设置这么大是因为没收到前是不知道到底多大的
        DatagramPacket dp = new DatagramPacket(bytes,1024);//用于接收数据
        ds.receive(dp);//接收数据
        //数据再字节数组里 需要转化
        String s = new String(bytes,0,dp.getLength());//接收字节的位置
        System.out.println("服务器:" + s);
        //发送数据给客户端
        byte[] bs = "你也好".getBytes();
        DatagramPacket dp2 = new DatagramPacket(bs,bs.length, InetAddress.getByName("localhost"),9898);
        ds.send(dp2);

    }
}
实现多人在线聊天
客户端
public class Client {
    public static void main(String[] args) throws Exception{
        System.out.println("请输入一个端口号");
        Scanner sc = new Scanner(System.in);
        int port = Integer.parseInt(sc.nextLine());
        String name = "用户" + String.valueOf(port);
        DatagramSocket ds = new DatagramSocket(port); //当前本地测试不填写固定端口 否则多个窗口都是使用的一个端口
        String hello = "来了一个新朋友"+ name +",大家打个招呼吧";
        byte[] bs = hello.getBytes();
        DatagramPacket dp = new DatagramPacket(bs,bs.length, InetAddress.getByName("localhost"),10086);
        ds.send(dp);
        new SendThread(ds,name).start();
        new ReceThread(ds).start();
    }
}
服务端
public class Server {
    public static void main(String[] args) throws Exception{
        DatagramSocket ds = new DatagramSocket(10086);
        //客户端列表和地址
        //ip port 解决如何获得需要发送的多个客户端地址问题
        List<HashMap<String,String>>clientList = new ArrayList<>();

        //持续收发状态 所以无限循环
        while (true){
            //1.接收数据
            byte[] bytes = new byte[1024];
            DatagramPacket dp = new DatagramPacket(bytes,1024);
            ds.receive(dp);
            String ip = dp.getAddress().getHostAddress();
            String port = dp.getPort()+""; //+“” 处理成字符串
            //2.判断客户端是否是新来的
            boolean flag = true;
            for (HashMap<String,String> map:clientList){//client拿出来循环和遍历
                if (map.get("ip").equals(ip) && map.get("port").equals(port)){
                    //不是新来的
                    flag = false;
                    break;
                }
            }
            if (flag == true){ //确定不重复后地址加入数据
                HashMap<String,String> map = new HashMap<>();
                map.put("ip",ip);
                map.put("port",port);
                clientList.add(map);
            }
            //复用上述循环用于发送信息 当是当前地址时则不用再发送信息
            for (HashMap<String,String> map:clientList){//client拿出来循环和遍历
                if (map.get("ip").equals(ip) && map.get("port").equals(port)){
                    continue;
                }else { //不是自己当前ip的
                    DatagramPacket dp2 = new DatagramPacket(bytes,0,dp.getLength(), InetAddress.getByName(map.get("ip")),Integer.parseInt(map.get("port")));
                    ds.send(dp2);
                }
            }
        }
    }
}
发送线程
public class SendThread extends Thread{
    private DatagramSocket ds;
    private String name;
    public SendThread(DatagramSocket ds,String name){
        this.ds = ds;
        this.name = name;
    }
    @Override
    public void run() {
        Scanner sc =new Scanner(System.in);
        while (true){//不停的发送数据
            try {
                String str = sc.nextLine();
                String str2 = name + " :" + str;
                byte[] bs = str2.getBytes();
                DatagramPacket dp = new DatagramPacket(bs,bs.length, InetAddress.getByName("localhost"),10086);
                ds.send(dp);
            }catch (Exception e){
                e.printStackTrace();
            }

        }
    }
}
接收线程
public class ReceThread extends Thread{
    private DatagramSocket ds;
    public ReceThread(DatagramSocket ds){
        this.ds = ds;
    }

    @Override
    public void run() {
        while (true){
            try {
                //接收数据
                byte[] bytes = new byte[1024];
                DatagramPacket dp = new DatagramPacket(bytes,1024);
                ds.receive(dp);
                System.out.println(new String(bytes,0,dp.getLength()));
            }catch (Exception e){
                e.printStackTrace();
            }
        }
    }
}
最终实现效果

URL
URL:统一资源定位符,说白了也就是互联网上的地址。
下面演示一下如何通过URL获取图片。
了解即可,使用场景较少。
public class UrlTest {
    public static void main(String[] args) throws Exception{
        //1.创建URL对象
        URL u = new URL("http://taurusmay.top/upload/Lb2.jpg");
        //2.打开这个链接
        URLConnection uc = u.openConnection();
        //3.读取内容
        InputStream is = uc.getInputStream();
        FileOutputStream fos = new FileOutputStream(new File("lj.jpg"));

        byte[] bytes = new byte[1024];
        int len = 0;//默认长度
        //当读取的内容长度不等于-1(最后)时执行
        while ((len = is.read(bytes) )!=-1){
            fos.write(bytes,0,len);
        }
        fos.flush();
        fos.close();
        is.close();
        System.out.println("下载完毕");
    }
}
知识点补充
1.a++和++a
a++ 让a自增1,相当于a = a + 1
++a 让a自增1,相当于a = a + 1
单纯使用两项时没有区别的
当在进行赋值操作时会有所区别
a++的结果就是a,++a的结果就是a+1
在做参数的传递的时候,如果想让(变量+1)作为参数,此时可以使用++a
2.自定义泛型
1.类的泛型
2.接口的泛型
public class 类名\<泛型>{ }
public interface 接口\<泛型>{ }
类名< 具体的数据>
泛型可以认为就是一个变量,在这个变量在使用的时候会被复制,这个数据类型可以用来声明变量,但是不能new String Str
new String() -> 构造方法
3.方法的泛型
public <泛型> 返回值 方法 (参数){ }
特点:方法的泛型会根据方法的参数进行改变。 写一个方法,给方法传递一个数组,把数组转化成list

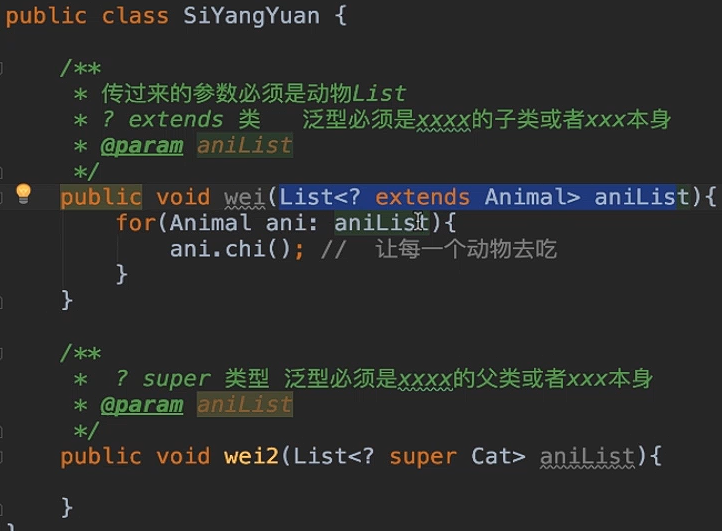
通配符(非重点)
? 可以匹配所有的数据类型
内部类 重点记规则,匿名内部类
内部类的概念:就是在一个类中定义另一个类
1.成员内部类:
把一个类定义成一个类似成员变量
2.局部内部类
在方法中声明的类
3.匿名内部类
写一个没有名字的类
4.静态内部类
在成员内部类前面多了一个 static,调用方式比成员内部类舒服。
不要把所有东西都写内部类。
枚举 类似定义常量的
加入定义一个星期,只会存在周一到周日,那么以外的则需要另外编写条件
enmu 取值范围是固定的,并且是由程序员来进行定义的
public enum 类型{ 值; }
枚举最大的作用,限定变量的取值范围。 n
线程池
线程池:帮助我们调度和使用线程
1.cached 带有缓冲的
2.fixed 限制线程数量
3.sheduled 可以推迟一些线程的执行
4.Single 单根线程依次排队执行 报错会自动修复 后面线程继续执行
线程池子
ExecutorService es = Executor.newxxxxxThreadPppl()//创建线程池
es.execute(()->{ })//简化线程 仅限内有单个线程
评论区